之前介绍过了spring-boot的web应用搭建 下面介绍下数据库的操作,方式有很多种,这里就拿spring-jdbc来简单介绍下如何操作DATASOURCE
项目搭建依赖代码请参考文章: spring-boot(一) web应用 spring-boot太强大了,基本上帮我们集成了各种框架.当我们想要使用某种框架的时候,就直接引入依赖即可
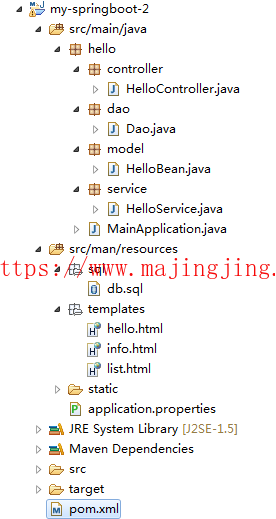
项目结构

- pom引入依赖
<dependency>
	<groupId>org.springframework.boot</groupId>
	<artifactId>spring-boot-starter-jdbc</artifactId>
</dependency>
<dependency>
	<groupId>mysql</groupId>
	<artifactId>mysql-connector-java</artifactId>
</dependency>
- 编写application.properties,加入连接数据库的配置
spring.datasource.driver-class-name=com.mysql.jdbc.Driver
spring.datasource.url=jdbc:mysql://localhost:3306/springboot?useUnicode=true&characterEncoding=UTF-8
spring.datasource.username=root
spring.datasource.password=root
-
建立数据库,脚本见附件
SET FOREIGN_KEY_CHECKS=0; -- ---------------------------- -- Table structure for `hello` -- ---------------------------- DROP TABLE IF EXISTS `hello`; CREATE TABLE `hello` ( `id` int(11) NOT NULL AUTO_INCREMENT, `msg` varchar(255) DEFAULT NULL, `date` datetime DEFAULT NULL, PRIMARY KEY (`id`) ) ENGINE=InnoDB AUTO_INCREMENT=4 DEFAULT CHARSET=utf8; -- ---------------------------- -- Records of hello -- ---------------------------- INSERT INTO `hello` VALUES ('1', '你好', '2016-12-21 15:32:33'); INSERT INTO `hello` VALUES ('2', '我好', '2016-12-21 15:32:45'); INSERT INTO `hello` VALUES ('3', '大家好', '2016-12-21 15:32:54'); -
编写数据库成java代码,此处我已经写了通用的dao层代码
package hello.dao; import java.sql.ResultSet; import java.sql.SQLException; import java.util.ArrayList; import java.util.List; import org.springframework.beans.factory.annotation.Autowired; import org.springframework.dao.DataAccessException; import org.springframework.jdbc.core.BeanPropertyRowMapper; import org.springframework.jdbc.core.JdbcTemplate; import org.springframework.jdbc.core.ResultSetExtractor; import org.springframework.stereotype.Repository; import org.springframework.transaction.annotation.Transactional; /** * @author majinding888@foxmail.com * @date 2016-11-14 下午1:36:25 */ @Repository public class Dao { @Autowired private JdbcTemplate jdbcTemplate; // @Transactional(readOnly = true) public <T> List<T> queryForList(final Class<T> clazz, String sql, Object... args) { final List<T> items = new ArrayList<T>(); jdbcTemplate.query(sql, args, new ResultSetExtractor<Object>() { @SuppressWarnings({ "rawtypes", "unchecked" }) public Object extractData(ResultSet rs) throws SQLException, DataAccessException { int currentRow = 0; while (rs.next()) { items.add((T) new BeanPropertyRowMapper(clazz).mapRow(rs, currentRow)); currentRow++; } return items; } }); return items; } @SuppressWarnings({ "rawtypes", "unchecked" }) // @Transactional(readOnly = true) public <T> T queryForObject(final Class<T> clazz, String sql, Object... args) { if (clazz == String.class || clazz == Integer.class) { return (T) jdbcTemplate.queryForObject(sql, clazz, args); } return (T) jdbcTemplate.query(sql, args, new ResultSetExtractor<Object>() { public Object extractData(ResultSet rs) throws SQLException, DataAccessException { if (rs.next()) { return (T) new BeanPropertyRowMapper(clazz).mapRow(rs, 0); } else { return null; } } }); } @Transactional public int update(String sql, Object... args) { return jdbcTemplate.update(sql, args); } } -
编写service层
@Service public class HelloService { @Autowired Dao dao; public List<HelloBean> queryHellos() { List<HelloBean> hellos = dao.queryForList(HelloBean.class, "select * from hello "); return hellos; } public HelloBean queryHello(Integer id) { HelloBean hello = dao.queryForObject(HelloBean.class, "select * from hello where id = ? ", id); return hello; } } -
编写controller
@Controller public class HelloController { @Autowired HelloService service; @RequestMapping("/hello/list") public String list(Model model) { model.addAttribute("list", service.queryHellos()); return "list"; } @RequestMapping("/hello/info") public String info(Integer id, Model model) { model.addAttribute("v", service.queryHello(id)); return "info"; } 省略... -
编写页面
- list.html
<!DOCTYPE html> <html> <head> <title>list.html</title> <meta name="keywords" content="keyword1,keyword2,keyword3" /> <meta name="description" content="this is my page" /> <meta name="content-type" content="text/html; charset=UTF-8" /> </head> <body> <table> <thead> <tr> <th>编号</th> <th>消息</th> <th>时间</th> </tr> </thead> <tbody> <tr th:each="v,vStat:${list}"> <td th:text="${v.id}">1</td> <td th:text="${v.msg}">你好</td> <td th:text="${v.date}">2016-12-22</td> </tr> </tbody> </table> </body> </html>- info.html
	<!DOCTYPE html>
	<html>
	<head>
	<title>info.html</title>

	<meta name="keywords" content="keyword1,keyword2,keyword3" />
	<meta name="description" content="this is my page" />
	<meta name="content-type" content="text/html; charset=UTF-8" />

	</head>

	<body>

		<div th:text="${v.id}">编号</div>

		<div th:text="${v.msg}">消息</div>

		<div th:text="${v.date}">时间</div>
	</body>
	</html>
到此整个例子就编写完成了,启动下主启动类, 打开浏览器看下效果


源代码附件: my-springboot-2.zip
 打赏下吧
打赏下吧

